WhatToDo Support
  • Instructions
  • Forum
  • FAQ
  • About What To Do
  • Contact
  • Instructions
  • Forum
  • FAQ
  • About What To Do
  • Contact

WhatToDo Support

Find answers and help fast

media

Media: Logos, Images & Movies

“Media” includes logos, images and video. The Media section of the Admin functions the same in all areas of the Web Content, including Activity/Dining Listings, Coupons, Events, and Specials.

The Media Gallery is the area where you upload Logos, Images and Video. You can get to the Media Gallery by clicking “My Businesses” button on your web dashboard and then choosing “Media” tab. Or you can go to an individual item (Event, Listing, Coupon) and select the “Media’ button on the left.

Images added directly in your My Businesses section media area will be available for use in all your business’s Items so you can use them in any or all of your listings. Images entered in a specific item (i.e. Listing or Event) will ONLY be available for this Item. Media files may be shared among multiple Items by checking the box that reads “Allow this image to be used for any of my items” after uploading the file. You may also restrict its use by checking the box next to “Allow this image only for this specific Item.”

Media File Guidelines

  • Web image files must be JPEG or PNG.
  • Web logos should be 200×200 px.
  • NOTE: For Coupons in BOTH print and web admin: logo files must be print-quality of 300 dpi or higher. Files must be .eps, .pdf, .jpg, .tiff or native files from Adobe Illustrator (.ai) and PhotoShop (.psd). They must fit into an area that is 2.25” x 1.5.”
  • Gallery Images can be up to 500 px wide. If the file size is very large (i.e. print quality images), it will slow down the WTD system. You’ll want to resize them in a photo editing program such as Photoshop, Gimp or Microsoft Picture Manager (either resize to 72 dpi or select “web sized”) before uploading the image file.

Logos

The logo is a square thumbnail image that will always appear next to your business name. You can upload your actual logo or you can upload a photo and use it as a logo. This is how a listing with a logo appears on the website:

All items (Coupon, Listing, Special, etc.) should have at least one logo available when you click the gray “Media” tab on the left.

If you have not already entered a Logo for your business, the system may generate a text Logo for you. In some instances, there may be more than one Logo to choose from. In this case, one will appear with “Active” in the green box above the image and the rest will appear with “Inactive” in a red box above the image. Only ONE logo may be Active (appearing on the live website) at any given time. If the correct logo is marked “Active,” no further action is required. If you would like to change the Active Logo for a specific Item please click the word “Activate” under the desired Logo. The image should now appear with “Active” in a green box.

If the correct Logo file does not appear among your choices, click the “Add Logos” box at the top right of this field.

  • For use in Coupons (in both print admin and web admin): logo files must be print-quality of 300 dpi or higher. Files must be .eps, .pdf, .jpg, .tiff or native files from Adobe Illustrator (.ai) and PhotoShop (.psd). They must fit into an area that is 2.25” x 1.5.”
  • For web admin (everything except coupons): logo files must be JPEG, size 200×200 px.
  • A popup window will appear. Click the green box that reads “Upload file” and select the file from the location you’ve saved it in.
  • Fill in the fields for: “Keywords,” “Alt Tag,” (i.e. alternate I.D.), “Description,” and “Photo Credit” (if available). While filling out all these fields is optional, the more info you include here, the better your Search Engine Optimization. (Web crawlers can’t understand images, so they’ll use this text about your image to help determine the page content and search rank.)
  • Below these fields, there is a box you can check to “Allow this image to be used for any of my listings.” If you check this box, this image will appear as an option in the Media section of your other Items, and you will have the opportunity to select it with those specific Items (It does not automatically appear with any of your Events or Listings.) If you don’t check this box, the image will only be available for this Item.

Slide Show or Gallery Images

On the website, images appear at the bottom of a listing with the option of scrolling forward and backward.

To upload your photos:

  • Go to the media page (either through your Business or a specific item)
  • “Click “Add Photos.”
  • A popup window will appear. Click the grey box that reads “Upload file” and select the file from the location you’ve saved it in. Click “Start Upload”.
  • Fill in the fields for: “Keywords,” “Alt Tag,” (i.e. alternate I.D.), “Description,” and “Photo Credit” (if available). While filling out all these fields is optional, the more info you include here, the better your Search Engine Optimization.
  • Below these fields, there is a box you can check to “Allow this image to be used for any of my listings.” If you check this box, this image will appear as an option in the Media section of your other Events and Listings, and you will have the opportunity to select it (It does not automatically appear with any of your Events or Listings.) If you don’t check this box, the image will only be available for this Event (or Event Recurrences) or Listing.
  • Click “Upload File.” Make sure the image you’ve just uploaded is “Active” in order for it to appear on the live website.
  • Images: Max. width 500 px; height should be appropriately proportionate. If files are very large (i.e. print-quality images), you’ll need to resize them in a photo editing program such as Photoshop, Gimp or Microsoft Picture Manager (either resize to 72 dpi or “web” sized)
  • Fill in the fields for: “Keywords,” “Alt Tag,” (i.e. alternate I.D.), “Description,” and “Photo Credit” (if available). While filling out all these fields is optional, the more info you include here, the better your Search Engine Optimization.
  • Below these fields, there is a box you can check to “Allow this image to be used for any of my listings.” If you check this box, this image will appear as an option in the Media section of your other Events and Listings, and you will have the opportunity to select it (It does not automatically appear with any of your Events or Listings.) If you don’t check this box, the image will only be available for this Event (or Event Recurrences) or Listing.
  • Click “Upload File.” Make sure the image you’ve just uploaded is “Active” in order for it to appear on the live website.
  • You may adjust the order in which the images will display in your Slideshow by clicking on the image and dragging it to the position in which you’d like it to appear.

Videos

You may include as many videos as you’d like in the Available Videos section of each item (Event or Listing). You may also choose not to include any videos at all.
Your videos are stored in the section called “Available Videos.” They will appear with either “Active” in a green box above the file or “Inactive” in a red box above the file. “Active” videos appear on the live website, while “Inactive” ones are saved here but aren’t visible to the public. They remain available for you to make public whenever you choose. Click “Activate” or “Inactive” (in the box below the image) according to which video(s) you want to display.

  • The system only allows YouTube videos. You cannot load a video file directly into the Admin.
  • If the correct video file does not appear among your choices: Click the “Add Video” box at the top right of this field.
  • A popup window will appear. Select “YouTube” in the dropdown box and paste the video URL (the web address that appears at the top of the screen on Youtube when your video is open) into the second field. NOTE: Do not use either the YouTube “Share” link or “Embed” code. Only use the URL in your address bar when watching the video.
  • Click “Submit.” You should receive a message that says “Upload Success.”
  • If you have multiple videos, you may adjust the order in which they will display in your listing by clicking on the file and dragging it to the position in which you’d like it to appear.
Last Updated: 2 years ago

By james

Tags: file, film, graphic, image, logo, media, photo, pic, picture, upload, video, YouTube

My Businesses

As a WhatToDo client, you may have more than one Business entity advertised in our system (called “Businesses”). We create one account and login for you and create separate Businesses within that account. They are visible by clicking the “My Businesses” button on your Web Dashboard. The number on the right side of this button indicates the number of businesses you have listed with WhatToDo, so please make sure that it is correct.

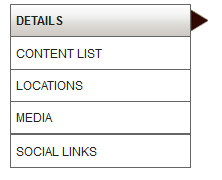
Whether you have just one Business or many, they will all have a Business Profile consisting of the following pages:

business_profile


You will need to fill out or confirm the existing information is correct on each of the above tabs. You can move between these pages by clicking on the actual tab or by navigating with the “Next” and “Back” buttons at the top of the forms.

Details

  • Fill out Business Name, Business Display Name (how your name will appear on the website network), website, phone, email, country, state and General Business Description. If your business has different locations with different phone and email, you can enter that in the “Locations” page. Business “Details” should be your official, primary contact info.
  • Primary Contact and Primary Staff – our existing contact should appear automatically here. If the name that appears is not correct, click the blue text that says “Go To Staff Grid.” Here, you can add a new staff contact (the person who will be in charge of updating and maintaining your business’s info on the WhatToDo network) by clicking the button “Add New Staff.”
  • Make sure that the resort or resorts you have paid to advertise in appear in the box “Resorts.” If not, please contact WhatToDo.

Content List

  • The Content List is like your Table of Contents for your business info on the WhatToDo network. You’ll see the total number of:

Activity Listings
Dining Listings
Coupons
Events
Banners
Specials
Vacation Rentals
“Active” items are things that are current and are visible on the live website, but you can also access all your past items in your “Inactive or Expired Content.” This information is useful for reporting on your marketing ROI and planning future activities based on what has been successful or unsuccessful in the past. You can also reactivate expired content when you want to use it again.

  • From the Content List, you can change the “Active” status of your items without leaving the list.
  • You can view the item’s complete info (and navigate away from this page) by clicking the item’s title (in blue text).

Locations

  • Every Business MUST have at least one Location. If your business operates at multiple locations, please list each one separately.
  • The Location that appears automatically in this box is based on the info in your Business Profile. If this is the Location is incorrect click on the “Edit” icon (the yellow square with the pencil image) on the right side of this field. Click the “Submit” button.
  • To add a new location, click the button on the right side of the Locations box that reads “Add New.”
  • A new popup box will appear. You will need to “Select a Location” from the dropdown. This is a specific area/neighborhood/town within your resort area. Then enter the street address. City, state and zip will be generated automatically. You will also want to add the specific email and phone number of this location. Then click “Submit.”map_edit_delete
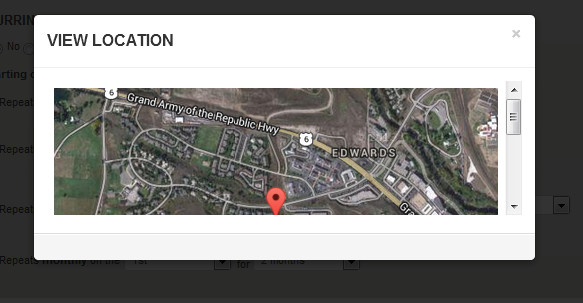
  • You can also place your listing so it shows up where you want it on the map. You do this by clicking the map thumbtack button in the green box, then dragging the pin to map location you choose.

plot_location


Media

In the Business Media page you can upload or select logos, images and videos that will be available for use in any of your listings. You can also add media to individual items (Listings, Events, Coupons) directly in those pages, but they will be available to that unique item.

Please view the Media Instructions page for more information.

Social Links

This functionality is under construction. For now, WhatToDo actively promotes all its clients on Facebook at:

WhatToDo Aspen/Glenwood

WhatToDo Summit County

WhatToDo Vail Valley

Please “Like” us on each of these pages for us to be able to promote you through social media.


Follow us on LinkedIn!


On Twitter at:

@WhatToDoVail

@WhatToDoSummit

Please “follow” us on each of these pages for us to be able to promote you through social media.


Last Updated: 6 years ago

By james

Tags: account, business, content, details, Facebook, locations, media, profile, social links, Twitter

Recent Posts

  • Transfer Business Between Clients
  • Protected: Push-to-Web
  • Protected: Resorts (for Admin Management)
  • Protected: Master Items
  • Protected: Taking Credit Card Payment

Recent Comments

    Archives

    • July 2019
    • September 2015
    • April 2015
    • February 2015
    • January 2015
    • December 2014
    • August 2014
    • July 2014

    Instructions

    • General Directions
    • My Print Advertising
    • My Web Advertising
    • Uncategorized
    • WordPress Plugin
    • WTD Administrator Instructions

    Meta

    • Log in
    • Entries feed
    • Comments feed
    • WordPress.org

    Popular Posts

    • Transfer Business Between Clients
    • My Businesses
    • Definitions of Print Items
    • Print Dashboard
    • Print Listings

    Copyright 2014. All Rights Reserved.